


Saving images and videos for your machine vision camera with the free Galaxy SDK
If you're looking to save images and videos efficiently with an industrial camera, our free Galaxy SDK offers a user-friendly solution. We provide a basic plugin that allows you to save captured images directly to your hard drive or as a video. In this article, we will guide you through the different settings and offer recommendations for capturing and saving images and videos using our industrial camera.
Videos and images save plugin with the Galaxy SDK
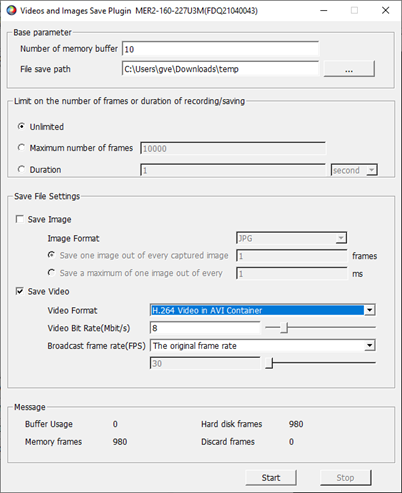
Before you start, make sure you've installed our Galaxy SDK, which includes drivers and manuals for your convenience. Once installed, run the program "Daheng Galaxy Viewer(x64)," and navigate to Plugin -> Videos and Images Save Plugin, as shown in the screenshot below. With this plugin, you can easily save captured images in various formats or create video files.

Configuring the base parameters for the videos and images save plugin
You can set the following parameters for the plugin:
- Number of memory: This determines the number of images buffered into memory. We recommend using a value of 10 for optimal performance.
- File save path: This sets the location where your images or videos will be saved.
Limiting the total frames or recording/ saving duration
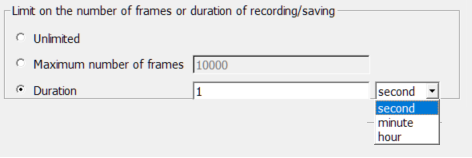
You have the flexibility to decide the total time duration for which the plugin will run or the number of frames that will be saved. You can choose from three options:
- Unlimited: The plugin will continue running until the storage is full, at which point it will stop capturing images.
- Maximum number of frames: The plugin stops capturing images after reaching the specified frame count.
- Duration: You can choose a specific time duration in seconds, minutes, or hours for the plugin to run.
Saving the file settings for the videos and images save plugin
In this section, you can choose between "Save Image" or "Save Video."
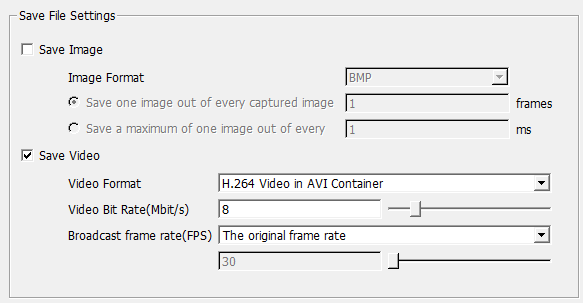
Save image option
To enhance your image saving capabilities, simply tick the box to enable the Save Image option. Tailor the settings to your desired image capture rate, and we'll recommend the most suitable formats. Our testing involved a 1.6MP Mono camera paired with a powerful laptop equipped with a 10th generation I5 processor, 8GB memory, and a reliable SSD from the year 2020.
Image format
When it comes to image format options, our setup offers impressive capturing frame rates without losing any frames. Here's a breakdown of the formats and their respective attributes:
- BMP: At 200fps, with 1.6mb of uncompressed data, BMP is ideal for high-speed image saving. However, due to its large file size, it's recommended for shorter durations to avoid filling up your hard drive quickly.
- PNG: With a frame rate of 5fps and 0.7mb, PNG uses lossless compression, ensuring top-notch image quality. It's perfect for image processing in later stages, although it may require more CPU power for compression.
- JPG: With a frame rate of 30fps and less than 0.1mb, JPG offers compressed images. Keep in mind that this format irreversibly decreases image quality, making it less suitable for image processing in the future.
- RAW: At 100fps, with 1.6mb of uncompressed data, RAW format is not recommended. Instead, we suggest BMP, as RAW files can only be opened with Halcon software. For color images, it results in a picture without debayering, while for mono images, the file format differs from BMP.
In addition to these format options, you can customize how many images to keep within a specific frame or time interval. This feature grants you greater control over image saving, catering to your unique requirements.
The next 2 options let you choose how many pictures you want to keep every X frame or X time.

For example, if set to 1, then every image will be saved. If the value is set to 10, then 1 image out of every 10 will be saved.
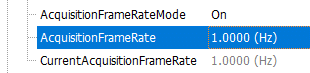
The plugin operates in software trigger mode, granting you the freedom to grab images on demand, perfectly aligning with your chosen save image parameters. However, when the camera is in free run mode, it is essential to maintain a fixed frame rate for stable plugin performance.
To ensure seamless operation, be cautious when using the plugin alongside automatic exposure, white balance, or gain settings. These settings can influence exposure time, consequently affecting the frame rate and potentially causing interruptions in image capturing.
Thankfully, you can maintain stability by limiting the camera’s frame rate and controlling automatic exposure and gain settings.
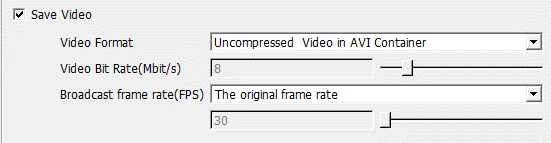
Save video option
Our plugin offers a fantastic feature - the ability to save your captured images as videos. Utilizing the GalaxySDK's basic functionality for video saving, you can choose from various file types to suit your needs.
With the same laptop and a 1.6MP mono camera, you can achieve impressive maximum frame rates (without any image drops) for different video formats:
- H.264 Video in AVI Container: Up to a maximum of 90fps
- H.264 Video in mp4 Container: Also capable of reaching a maximum of 90fps
- Uncompressed Video in AVI Container: The highest frame rate possible, peaking at 120fps
Now, let's discuss file sizes when recording a 1-minute video with the 1.6MP mono camera at 60fps:
- H.264 Video in AVI Container: Approximately 67mb
- H.264 Video in mp4 Container: Also around 67mb
- Uncompressed Video in AVI Container: Significantly larger, hitting 5490mb
Although uncompressed files deliver the best image quality and save speed, they require substantial hard drive space. If you have sufficient space available, we recommend using this setting. Otherwise, opt for H.264 Video in AVI Container with an 8mbit/s video bit rate for optimal results.
The maximum framerate is influenced by your PC's specifications, the number of megapixels, and the frame rate. For instance, if you switch from a 1.6MP camera to a 6MP camera, the data increases by a factor of 6/1.6=3.75, leading to a corresponding reduction in the maximum framerate. In the case of H.264 Video, the frame rate would be reduced from 90fps to 90/3.75=24fps when using the 6MP camera.
Adjusting the broadcast frame rate allows you to set the framerate for the video according to your preferences:
- Original framerate: We recommend this option, as it aligns the saved video's frame rate with that of the captured images.
- Custom framerate: Alternatively, you can set a lower framerate for the saved video. For instance, if your camera captures images at 90fps and you select a custom framerate of 30fps, the resulting video will play at a slower rate with a factor of 90/30=3. For a 10-second video captured at 90fps, the saved video will play for 30 seconds at 30fps.
By utilizing these options, you can create high-quality videos that suit your requirements perfectly.
Message of the videos and Images Save Plugin
In this field you can see if your PC is powerful enough to record all the images / videos in real time. The memory frame shows the number of images captured to the memory. The hard disk frames show how many images are sent to the hard disk. If the number of hard disk frames is lower than the memory frames, images are lost and not every captured image was saved. In that case you must reduce the framerate, change different file format saving, or use a more powerful pc.

Step-by-step example for 24h timelapse images using a machine vision camera
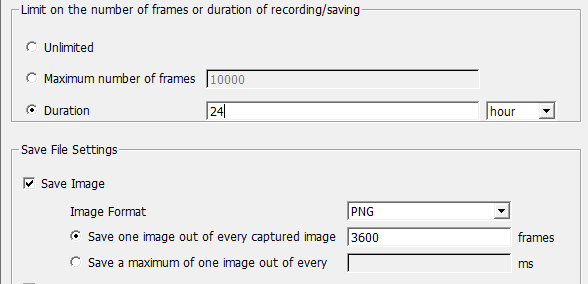
In this step-by-step example, we will guide you on how to capture an image from an industrial camera every hour, resulting in a captivating 24-hour timelapse. By programming the plugin to run for the entire 24-hour duration and stop after saving 24 pictures, you can witness the mesmerizing transformation of time. However, keep in mind that if your storage becomes full, the plugin will stop acquiring new frames, ensuring older frames remain intact.
To achieve the perfect timelapse, follow these correct settings:
- Reduce the Camera Framerate: Set your camera's framerate to 1 FPS. This lower frame rate is optimal for capturing images at spaced intervals, creating a visually appealing timelapse.
- Set Duration Limit to 24 Hours: Ensure the plugin runs for a continuous 24-hour period, capturing images throughout the day.
- Enable the Save Image Option: Activate the "Save Image" option to ensure each captured frame is stored for the timelapse.
- Set "Save One Image Out of Every Capture Image" to 3600: With a value of 3600 (1 hour = 3600 seconds), you'll capture one image every hour, resulting in 24 pictures for the entire timelapse.
- Run the Plugin: Start the plugin, and let it seamlessly capture the frames, creating a captivating and visually striking 24-hour timelapse.
With these carefully selected settings, you'll be able to cherish and share the enchanting transformation of time captured through your industrial camera's lens.
Optimizing the image and video saving with your machine vision camera
Our free GalaxyView software offers basic functionality for saving images, making it a great starting point. However, for more advanced features, we highly recommend creating your own custom image save program using our example programs in Python or C++. This will provide you with greater flexibility and customization options to suit your specific needs.
When it comes to advanced video saving, we have two exceptional recommendations:
- Kinovea (Free): Perfect for high-speed video recording during short periods or low-speed recording over longer durations. It's a versatile option to capture your industrial camera's footage efficiently.
- 2nd look ($695): This impressive software offers 24/7 video recording capabilities, catering to both high-speed and low-speed recording requirements. It's a reliable solution for continuous and uninterrupted video capturing.
If you require any assistance in choosing the best image or video save option for your industrial camera, feel free to reach out to us. Our experts are here to help you make the most informed decision and optimize your image and video saving experience.