


Using Depth of Field in your machine vision application
Depth of field is critical for acquiring a sharp image for the object/item that you are inspecting. Using the right depth of field, you can assure that the object/item that you are inspecting is in focus, while the background and foreground are out of focus. This way it is your vision software runs smoothly to recognize your object/item.
The depth of field is a critical factor for you to use to your advantage. Depth of field will be explained further in the article and how to properly use it. If you already have a question, reach out to our experts below.
What is depth of field?
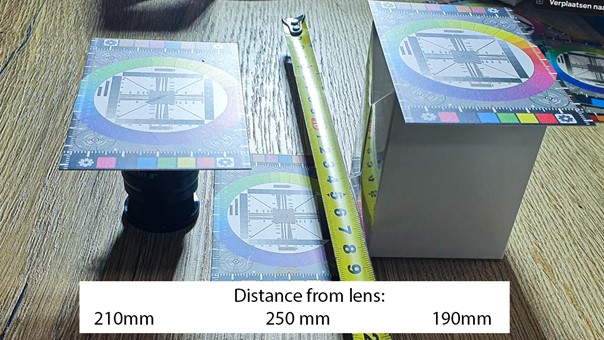
The depth of field is the area between the nearest and furthest object/item of the image that is in focus during acquisition. In the figure below, the working distance is 250mm. At 190mm is the closest object, at 250mm away is the furthest object, and at 210mm away, is the object that sits in between both objects.
If your machine vision camera setup has a shallow depth of field, 30mm for instance, you have the possibility to have the closest and the middle cards in focus, but the furthest card would not be in focus. When controlling the depth of field, you can get all three objects in focus, or you can blur two of the three objects.
Using the aperture to control your depth of field
The aperture of the iris can control how large the depth of field is going to be. If the iris is wider, for example, F1.4 of F2.0, the depth of field is relatively small. In some cases such as the F1.4, the depth of field could be a few millimeters. If the iris is closing, for example F16, the depth of field is larger and more of the image should be sharper. Please note that when you are closing the aperture, the image will be darker. An increased exposure time, gain or extra light results in a brighter image again.
To illustrate the effects of the aperture, we set up a test for the depth of field. In this example, we focus on objects at different distances from the camera.
Example with F-number F1.4
As mentioned in this article previously, a larger aperture (low F-number) will result in a small / shallow depth of field. A small depth of field is needed if you are going to have objects or items in the foreground or background that you want to blur.
Positives of F1.4
- Very light-sensitive (short exposure time and little to no digital gain required)
- Blur object in the foreground or background (easier for image to be processed in software)
Negatives of F1.4
- Small depth of field (image might not be sharp)
The image below shows that the card at 250mm is the sharpest of all three cards, the card at 210mm is not in perfect focus (details of your image might not be clear when processing in the software). The card at 190mm is even the most blurry card and is unusable.
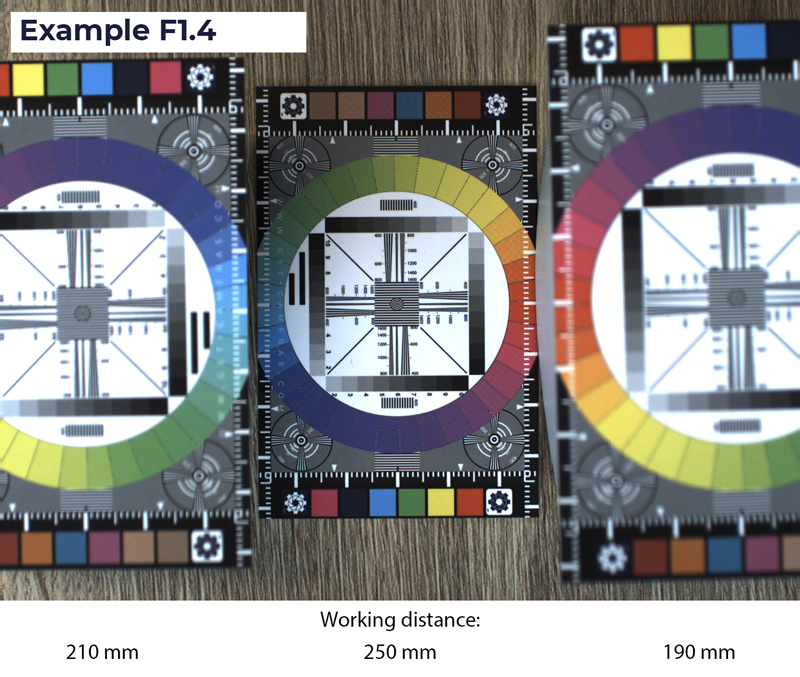
Images have been compressed for web.
Example with F-number F8
As mentioned in this article, a smaller aperture (high F-number) will bring about a larger depth of field. A larger depth of field is needed if your object or item has different heights that need to be tested. Additionally, if you have multiple objects that are closer or further away from the camera you will require a larger depth of field. A larger depth of field will allow both objects to be in focus.
Positives F8
- Large depth of field (larger area will be sharp)
Negatives F8
- Less light-sensitive (longer exposure time or more digital gain required. Adding extra light sources might be necessary depending on the application)
- Difficulty in blurring objects in the foreground of the background
In the image below, both card at 250mm and 210mm have acceptable sharpness. The card at 190mm still has a blurry image but not as blurry as in the F1.4 example. The lost light has been compensated with a longer exposure time and digital gain. When having a longer exposure time, this can result in motion blur for moving objects. Higher volume of digital gain will result in visible grain.

Images have been compressed for web.
Useful guidelines for depth of field
- Try to increase the working distance of the machine vision camera and the object if the depth of field is too small, but closing the aperture isn’t an option. This will cause the pixels per millimeter to decrease. Lastly, you can try a lens with a higher focal length if the actions above become an issue.
- Closing the aperture further for a larger depth of field will result in darker images. Enlarging the exposure time, adding digital gain, or simply adding a light source can make up for the loss.
- Closing the aperture slightly will result in a sharper image. The higher the F-number, the larger the depth of field.
- If possible, try to keep the aperture below F8. By closing the aperture more, you will also lose image quality due to the optical resolving power of the lens (see image below)
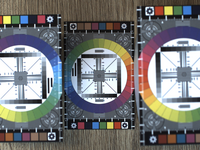
In the figure below, we used F16 as F-number. The aperture was almost closed completely. All of the cards are evenly sharp, but the total image quality is not up to standard.

Images have been compressed for web.
If you have any questions regarding this article, get in touch with us! We will answer your questions within 24 hours.