


How do I connect various industrial GigE cameras to one ethernet port of your pc?
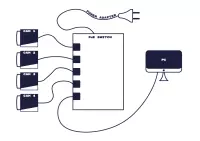
Learn how to connect 4 industrial GigE cameras to a single network port with ease. To do so, you will need the following materials:
- 4x MER-630-16GC-P, 6.3MP industrial GigE cameras
- 5 Port PoE switch 1000mbit / 1Gbit
- PC with windows 10 and a 1000mbit / 1Gbit network card
Before we begin, ensure that your connection speed is 1000mbit / 1Gbit and not 100mbit, as some PoE switches only offer the latter. This is a common mistake that many customers make, so it is crucial to double-check your connection speed before proceeding. Here is a helpful guide to check if you have a 1 Gbit connection. Note that you can only verify this once the industrial GigE camera is connected.
Step 1: Connect all GigE cameras to the PoE switch
Connect the GigE cameras to the PoE switch and check if the LED on the back of the GigE camera is on. This means that the GigE camera is receiving power from the PoE switch.
Step 2: Program correct IP address for each GigE camera
Each GigE camera needs to have its own IP address. Please see the examples below:
- Camera 1 -> 192.168.0.51
- Camera 2 -> 192.168.0.52
- Camera 3 -> 192.168.0.53
- Camera 4 -> 192.168.0.54
In step 1 and 2 of this article we explain how you can program the IP addresses of every GigE camera using the GigE IP configurator that is installed with our SDK.
Step 3: Calculate the packet size and package delay
Packet size and packet delay are essential parameters for managing the bandwidth of an industrial GigE camera. If you are connecting multiple GigE cameras to a single system, it is crucial to reduce the bandwidth of each GigE camera to ensure stable image transfer from the camera to your PC. Incorrect parameters can result in missing or incomplete images.
To avoid these issues, carefully calculate the appropriate packet size and package delay for your industrial GigE cameras. This will help you optimize your GigE camera network and ensure seamless image transfer without any disruptions.
Max bandwidth for each GigE camera
- The PC network card needs 10% of its bandwidth reserved for packet retransmission, so you can use 90% of 1 Gbps for data transfer.
• 1 Gbps = 1000 Mbit/s = 125 Mbyte/sec
• Available bandwidth is 125 Mbyte/sec * 0.9 (90% bandwidth) = 112,5 Mbyte/sec
• With 4 GigE cameras, the maximum bandwidth you can allocate for each camera will be 112.5 Mbyte/s /4= 28.1 Mbyte/sec per camera
• With a resolution of 6.3Mpixel per GigE camera, each GigE camera can have a max frame-rate of: 28.1 (max bandwidth available per GigE camera ) / 6.3Mpixel (resolution of camera) = 4,46fps
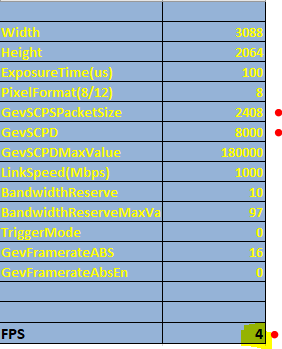
Defining Values Packet Size (GevSCPS) and Packet Delay (GevSCPD) Values for Industrial GigE Cameras
To ensure optimal performance of your industrial GigE cameras, it is crucial to define the right packet size (GevSCPS) and packet delay (GevSCPD) values. Here is how you can do it using the Daheng Imaging SDK:
- Open the frame rate calculator available on our download page after installing the Daheng Imaging SDK.
- Navigate to the tab with your GigE camera type (e.g., MER-630).
- Change the exposure time value to 100 in the Excel file.
- Change the GevSCPD value to 8000 in the Excel file.
- Adjust the GevSCPSPacketSize value to a level that ensures a frame rate of below 4.46fps. The maximum value is 8192.
- If the maximum value for GevSCPSPacketSize results in a much lower frame rate than the maximum frame rate (in our case, 4.46fps), you will need to lower the GevSCPD value so that the frame rate increases just below the maximum frame rate.
By following these steps, you can calculate the appropriate packet size and packet delay values for your industrial GigE cameras and optimize their performance for seamless image transfer.
Step 4: Programming the packet size and package delay
The calculated values must be programmed in each industrial GigE camera connected to our switch. We explain how to do this in step 3 of this article.
IMPORTANT NOTES FOR CONNECTING MULTIPLE INDUSTRIAL CAMERAS TO ONE PC
Connecting several high-resolution GigE cameras to a single network port may result in a GevSCPD value exceeding 1000. In such cases, you must increase the packet delay timeout to ensure timely image transfer from the industrial GigE camera to your PC. Failure to do so may result in incomplete frames and disrupt your image capture process.
To avoid such issues, it is essential to carefully manage the packet delay timeout and other relevant parameters when connecting multiple industrial cameras to one PC. By doing so, you can ensure optimal performance of your cameras and avoid any image transfer disruptions.
GeT Cameras recommended network switch
Our industrial grade switch is ideal for connecting 4 industrial PoE GigE cameras to your PC. The robust switch is unmanaged and has 1gb connection. It can be powered ON 24/7.
Industrial Switch: INDUSTRIAL SWITCH 4X POE
- Features a DIN rail mount for sturdy installation.
- Less sensitive to electrical noise.
- Can withstand challenging temperatures ranging from -40 to 75 degrees Celsius.
- Power supply is sold separately (the recommended model is the 24V / 60W Power Supply )
Do you still have questions about the switch, power supply or your GigE cameras? Fill in the form below and we get in touch as soon as possible.