


5 steps to use Kinovea for capturing, recording, measuring and annotating images with your machine vision camera

If you want to visualize, record, measure, annotate, and perform motion analysis with an industrial camera on your images, Kinovea is a useful open-source tool for you. Kinovea is perfect for sports, in a lab, and industrial automation applications. In this article, we will give you a step-by-step walkthrough on how to install Kinovea, set up recording parameters, and perform basic measurements and annotations for your industrial camera.
The following five steps will show you how.
Please note that GeT Cameras does not provide further support for Kinovea. For support, please contact Kinovea. Feel free to reach out to us if we could still help you selecting the right camera and lens for your project.
Step 1: Download and install Kinovea and the Daheng Plugin
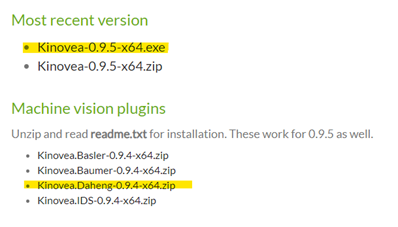
Visit the Kinovea download page and install Kinovea and Daheng plugin.
Then, open the readme.txt and follow the following instructions.

Step 2: Industrial camera images acquiring in Kinovea
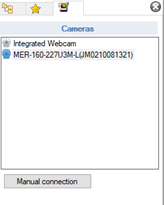
Once you have installed Kinovea and the Daheng plugin, capture live images by double-clicking on the camera name. You will then produce a live image of the industrial camera.
To change the industrial camera parameters, click on the wrench in the bottom left corner.
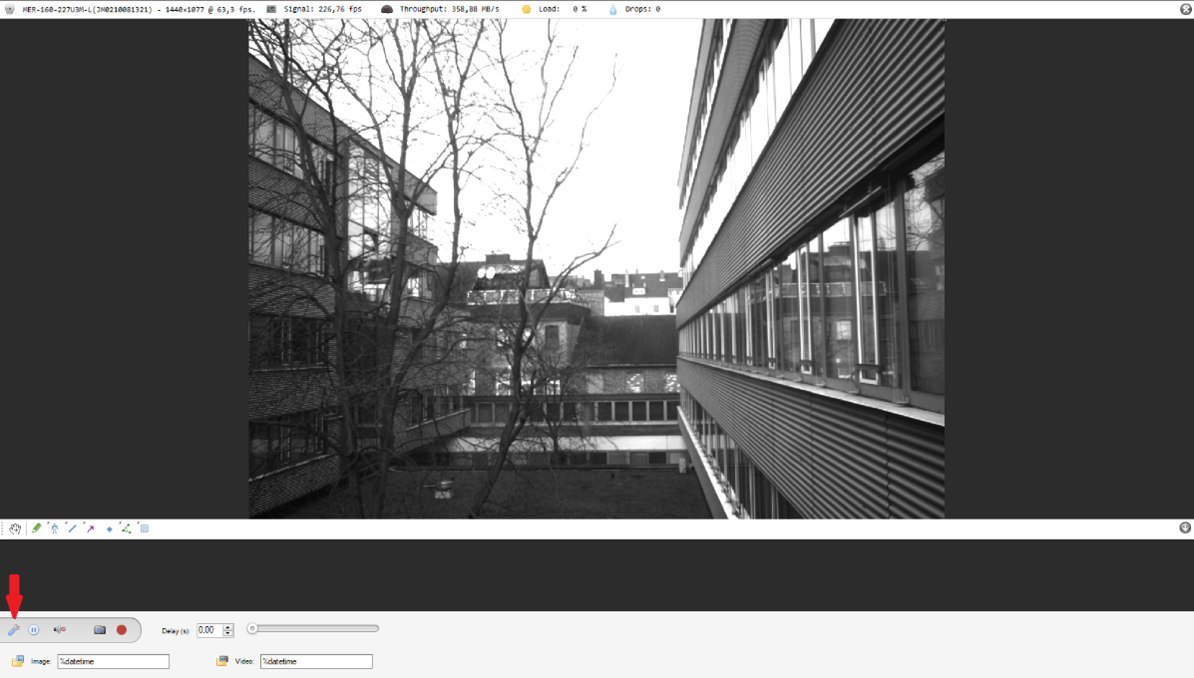
You will now see a pop-up with the camera parameters.

Step 3: Capturing images and recording videos in Kinovea
To capture a single image, click on the photo camera icon. To record a video, click on the red dot. To change the default capturing/recording parameters, go to Options > Preferences > Capture.

For more information about setting the perfect capturing parameters of your industrial camera, see the advanced video capture settings in Appendix 1 and the high-speed recording paragraph at the end of this article.
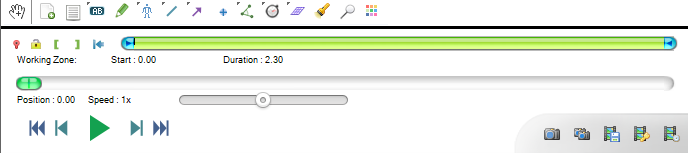
Step 4: (Slow)motion playback in Kinovea
Kinovea is commonly used to play high-speed recordings back in slow motion. When playing back a recorded video, use the menu to control the playback speed, measure time, and take screenshots.
More information can also be found on the Kinovea website:
https://www.kinovea.org/help/en/userinterface/preferences/capture.html
https://www.kinovea.org/help/en/capture/recording.html#performances
Step 5: Annotating recording images and video’s in Kinovea
In Kinovea it’s possible to annotate images and videos. Here are some of the most commonly used annotation examples:
Example 1: Measuring Distances on a Parallel Surface
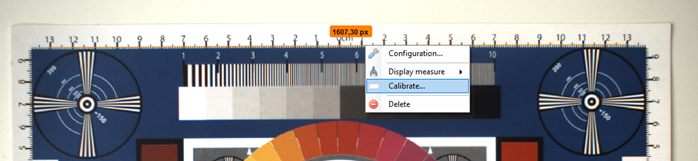
To measure lines in Kinovea on your acquired image, draw a line using the line button marked yellow. Click on the line, select Display Measure > Length, and the length in pixels will be displayed. To get the exact measurement in millimeters, use a ruler or an object of known size in your image. Draw a line along the object whose length you know, and left-click on the line. Go to Calibrate and fill in the object’s real length. From this point on, every line drawn will be shown in centimeters.

Click on the line, select Display Measure > Length, and the length in pixels will be displayed.

To get the exact measurement in millimeters, use a ruler or an object of known size in your image. Draw a line along the object whose length you know and click on the line (shown in the image below).
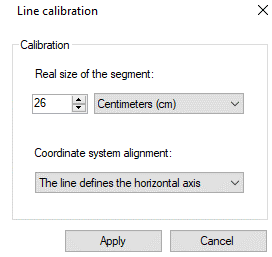
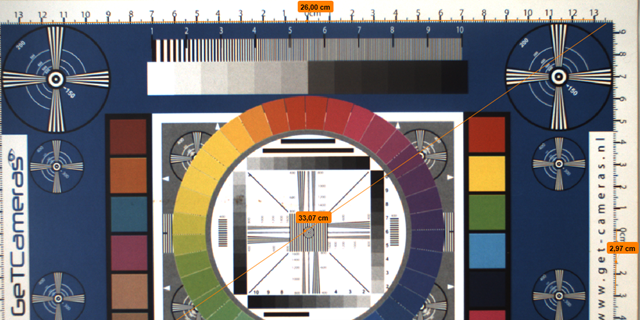
Go to Calibrate and fill in the object’s real length. From this point on, every line drawn will be shown in centimeters. In the example below, the number used is 26 centimeters.
Example 2: Measuring Distance of a Non-Parallel Surface
When using Kinovea for 3D non-parallel surfaces or planes, lay a grid over the plane with known dimensions. Click on the grid icon, place the grid on the correct position, and click on a corner to open the calibration menu. Enter the plane’s dimensions and click on “Apply.” Now Kinovea offers you the possibility to measure the distance with lines even if they have a certain depth.

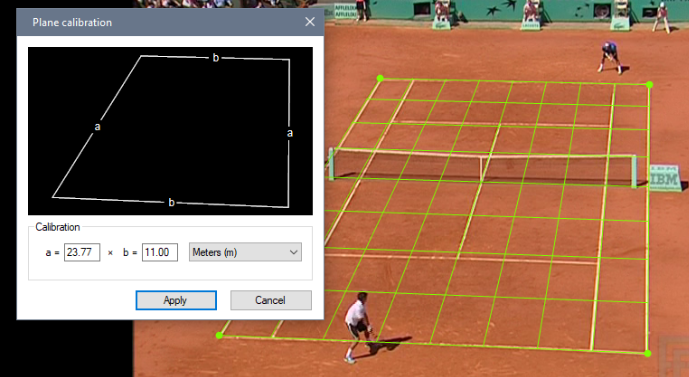
Enter the plane’s dimensions and click on “Apply.” Now you can measure the distance with lines even if they have a certain depth.
Please refer to the Kinovea documentation for more detailed explanations or more difficult applications.
Calibration mechanisms — Kinovea 0.9.5 documentation
Example 3: Movement Tracking and Measuring
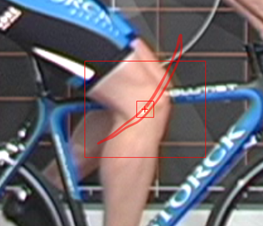
To start tracking a moving object with Kinovea in a recorded video, right click the object and select Track Path. Tracking will be done automatically but can be adjusted any time. For that just use the “Next” frame button or your mouse wheel and adjust the tracking point frame by frame.

The inner rectangle is the object window, and the outer rectangle is the search window. When automated tracking fails, correct it by dragging the object window to the right location. When tracking resumes, it will use this point as a reference.
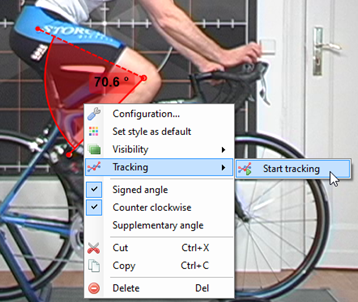
Kinovea also offers you a possibility to track angles, lines, or models, by right clicking the angle, line, or model and selecting Tracking > Start tracking. The correction procedure is the same.
High speed recording with your industrial camera
Kinovea is ideal for short high speed video recording with your industrial camera, but you need to tweak the settings to get the best performance. When processing speed is not fast enough, the PC can lose images, which can corrupt time measurements.
You can see the dropped images of your recording in the InfoBar at the top.

If you have too many drops, you need to find the bottleneck in your system and optimize the recording settings in Kinovea.
The first step is to check whether the CPU or the writing speed of the hard drive is the bottleneck. The system drive is already occupied with running the operating system, so make sure to avoid using it as a storage target.
Recording and saving videos with Kinovea will always be a tradeoff between memory/storage and speed. For example, if you have a big buffer, you can increase the buffer size and use “Retroactive” recording mode. This should avoid drops, but at the same time will increase memory usage.
There is no general solution to what settings are the best. You need to try different settings in Kinovea and see which works best for you.
Appendix 1 and 2 below will provide further explanation on how you can tweak the Kinovea parameters to increase high-speed recording performance.
Any questions?
If you still have questions after reading this article, please check the Kinovea website. For updates regarding new knowledge center articles, make sure to follow our LinkedIn page.
Appendix 1: Advanced video capture settings

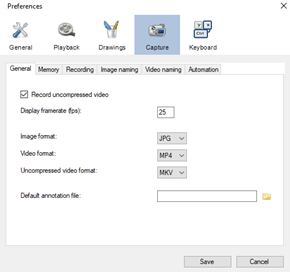
In the Capture Preferences’ General tab of Kinovea, you can set various parameters for your recordings. One such parameter is the option to record uncompressed video. This feature records videos without compressing video frames to MP4 first, resulting in more data in the images. However, not all video players can play back uncompressed files. Additionally, while recording uncompressed video reduces the CPU power required, it increases the write speed required of the hard drive.
- Uncompressed video recording: If you check this option, your video frames will be recorded without compression to MP4. This results in higher data quality, but may require more storage capacity and writing speed on your hard drive. Uncompressed video also requires less CPU power. However, not all video players can play back uncompressed files.
- Compressed video recording: When this option is unchecked, Kinovea will compress your video frames to MP4 using high quality settings to preserve the video’s integrity. Compressed video is smaller and can be stored faster, but may require more CPU power during recording.
- Display framerate: This option determines how often the camera images are updated on the capture screen. To reduce the overall load on your computer and improve recording performance, you can lower this value.
- Image format: If you want to save single images, you can choose the format of the saved image here.
- Video format: The video format setting lets you choose the format of the recorded video stream. For the best results, we recommend MP4, which is widely supported by most video players.
- Uncompressed video format: If you are recording in uncompressed mode, you can select the video format for the uncompressed video here.
Next step is the recording tab of the capture preferences.
The following settings can be set in the recording tab:
- Recording mode and delay: The recording mode option determines how the recording system interacts with the delay buffer. Images from the camera are always put in the delay buffer. There are three options available:
- Camera: when using this mode, the saved frame is always the most recent frame sent by the camera. The delay value set in the capture screen is ignored.
- Delayed: when using this mode, the saved frame is taken from the delay buffer based on the delay value. This can be used to record actions happening before the moment the record button is hit or triggered. With this option active, the saved frame is taken from the delay buffer, based on the value set in the capture screen. This feature is especially useful if you want to record events before the record button is pressed.
- Retroactive: when using this mode, the recording is not performed on the fly. Instead, at the end of the recording process, the camera feed is paused, the delay buffer is frozen, and the video file is created all at once. The delay value is taken into account for creating the recording. This mode offers the best recording performance and minimizes dropped frames, at the cost of a reduced maximum length for created videos and a temporary freezing of the camera feed. The maximum length of recorded videos depends on the size of the delay buffer, which can be configured from the Memory preference page.
- Recording delay: This option sets the delay value that determines how far back in time the video is recorded. This setting is only used when the delayed or retroactive recording mode is active.
By adjusting these settings, you can optimize the recording performance of your camera and create high-quality videos for your specific needs.
Appendix 2: writing speed hard drive for highspeed recording
If you want to record high-speed videos, it is crucial to consider the writing speed of your hard drive. You do not want the throughput to exceed the maximum writing speed of your drive, or else you will experience dropped frames. To test your writing speed, you can use a free benchmarking application. For instance, if you are using a 6MP color camera at 60fps, you will need a throughput of around 1100mb/s. The best SSD hard drives can handle a writing speed of approximately 500 mb/s. To meet the camera’s requirements, you may need to use three SSDs in a RAIDO configuration. Check out the screenshot below for reference.

To optimize your hard drive’s writing speed, consider capturing videos in RAW format instead of RGB for color cameras. By doing so, the debarring of the image can be done during playback, freeing up the processor power during recording and reducing the throughput required. To change this setting, access the camera parameters and select Raw as the stream format. Follow the image below for reference.
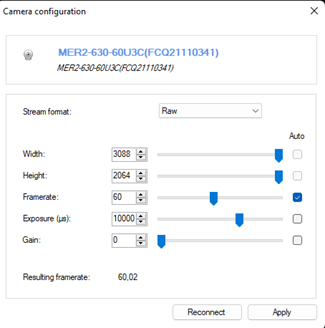
The Throughput is now reduced from 1100mb/s to 368mb/s. As a result, we don’t need three SSD hard drives.

If you have a fast enough hard drive with sufficient storage capacity, you can opt to record uncompressed videos, as shown in the screenshot below. This reduces the processing power needed for recording, but dramatically increases the size of the resulting video file. However, if this is not feasible, you can choose to record videos in compressed format, which consumes more processing power and may lead to dropped frames.

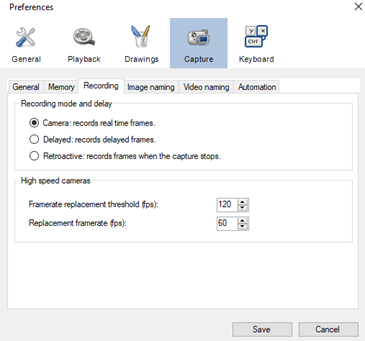
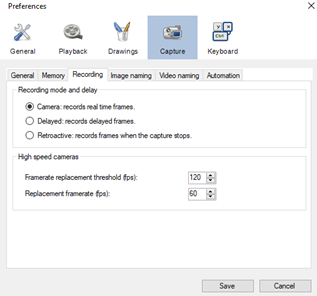
To avoid dropped frames, adjusting the Recording mode is crucial. You can access this setting by following the steps shown in the screenshot below. If your computer has at least 16 GB of RAM and a high-performance processor, we recommend selecting Retroactive recording. However, if your system does not meet those requirements, you can opt for either “Camera” or “Delayed” recording based on your needs. For more information, please refer to Appendix 1.
Replacement Framerate
The Replacement Framerate setting allows you to customize the playback speed of your video file by overwriting the framerate metadata. By doing so, you can reduce the number of resources needed for playback and ensure a smooth viewing experience.
While your camera may be capable of capturing and transmitting up to 1000 frames per second, your computer and monitor may not be able to handle that speed. To avoid playback issues, it is recommended to reduce the framerate of your video file to a more standard level. Many recording devices have an automatic framerate adjustment feature to achieve this. As a result, your video will play at a normal speed without appearing to be in slow motion.
Framerate Replacement Threshold
The Framerate Replacement Threshold is an essential option that determines when the output file’s framerate should switch to the lower replacement framerate. By setting the threshold, you can regulate the output video’s smooth playback and ensure that it does not appear choppy or laggy. For instance, if you set the threshold to 100FPS and your camera records at a higher frame rate, the video will be saved with the set replacement framerate. Later, when you open the video, you will see it in the saved replacement framerate, and it will appear in slow motion. Properly setting this threshold can have a significant impact on your video’s overall quality and visual appeal.
Check out the official Kinovea documentation for more detailed information.
Kinovea reference manual — Kinovea 0.9.5 documentation