


Menu
Getting Started with setting a custom Region of Interest (R.O.I.)
 inside an industrial camera in 3 steps")
- reduce the amount of collected data
- reduce the required bandwidth
- increase the framerate of an industrial camera
- isolate the view on a certain area
In this article we will set a Region of Interest and offset it from the top left corner to the centre of our image. Using these 3 steps you can define the size and position of the industrial cameras Region of Interest.
Check current Image size
Check the maximum image size (resolution) of your industrial camera and define your desired Region of Interest.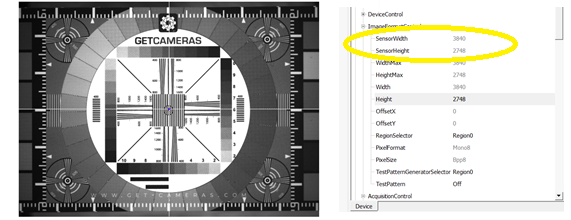
For this example, we used a camera with a maximum resolution of 3840x2748 pixels. We want our region of interest to be 1000x1000 pixels inside the industrial camera.

Define new Image size
***The menu only works when NO acquisition is running***To set the Region of Interest parameters of the industrial camera, the Daheng GalaxyView SDK is used. We will need to navigate and expand the menu ‘ImageFormatControl’. To adjust the size of your ROI, change the parameter ‘Width’ and ‘Height’ to the desired size (see orange box below). In our example the values are Width: 1000; Height: 1000.
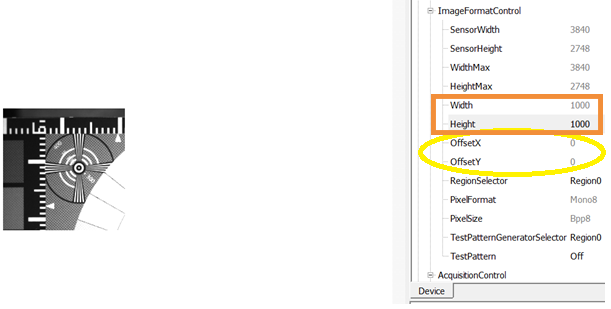
The ‘OffsetX’ and ‘OffsetY’ (yellow circle) are used to establish where this Region of Interest of 1000x1000 pixels will be.
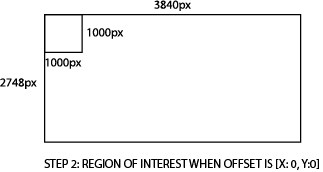
Offset to center the Region of Interest
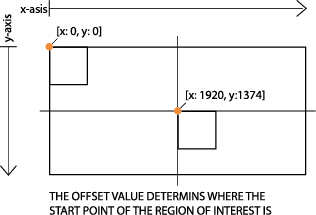
To define the region of interest’s offset values, we need to keep in mind that the counts begins from the top left corner (start point Region of Interest) of the main image, and always counts towards the bottom right corner.Example 1; start position of Region of Interest in centre of the whole image
The centre of the whole image is at the half of 3840 pixels for the width (x), and half of 2748 for the height (y), so at position [x:1920, y:1374]. If we change the offset to position [x:1920, y:1374], our Region of Interest of 1000x1000 will start in the centre of the whole image.However, the centre of the Region of Interest will not be the centre of the whole image.
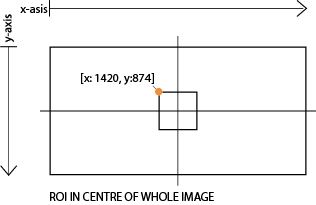
Example 2: Centre of the ROI = centre of the whole image
If we want the ROI to be in the middle of the whole image, we use the following formula:OffsetX = (MaxImageWidth/2)-(RoiWidth/2) = (3840 / 2) – (1000 / 2) = 1420
OffsetY = (MaxImageHeight/2)-(RoiHeight/2) = (2748 / 2) – (1000 / 2) = 874
By following these three steps, you can define the size of the ROI and its position inside the industrial camera.

Effects on Framerate
Decreasing the Region of Interest of a camera will result in a higher framerate. Less pixels means that the camera needs less time to acquire an image. Secondly, less pixels result in less data. Increase the frames per second to utilize the maximum bandwidth.If we take the MER-1070-10GM for example, with a maximum framerate of 10 FPS at maximum resolution (3840x2748). We can use the following formula to calculate the resulting framerate if we set a custom R.O.I. e.g. 1000x1000
FrameRate = 1 / (Traw ⋅ Height)
Where height is the number of pixels of the R.O.I. and Traw a fixed value, that can be calculated by (1/maxFPS)/maxHeight. If we take the MER-1070 as an example again, we first calculate Traw by using the formula: Traw = (1/10)/2748 = 0.0000369. Now we can calculate the new framerate. Framerate = 1/(0.0000369*1000) = 27.48 FPS.
Please note that the actual framerate might differ from the calculated value. Read more about calculating the frame rate.
Sunday,Monday,Tuesday,Wednesday,Thursday,Friday,Saturday
January,February,March,April,May,June,July,August,September,October,November,December
Not enough items available. Only [max] left.
Add to WishlistBrowse WishlistRemove Wishlist